This time we're going to incorporate the finishes schedule with values taken from the model. Let's start with the walls. You have to start the Material Takeoff tool found in the View/Schedules tab:
In the New Material Takeoff select the "Walls" category. After clicking OK it will take you to the Takeoff properties, let's start with the "Fields". For this example choose only "Material Mark", "Material Name" and "Material Area". If you remember from last post we assigned Mark and Name to the materials used in the project.
Next filter by Material Mark-begins with- M. This way the takeoff will only read those materials with a letter "M" assigned in their mark. We did that with all our WALL materials right?
In the "Sorting/Grouping" tab I would like to start the schedule with the Mark field, then the Name, then the Area. Uncheck the "Itemize every instance" box because we only want the materials named once. Otherwise you would have a great number of lines showing all the walls where materials are applied in the model.
In the Formatting tab repeat what is shown in the next image. Note that you can customize the header texts in the "Heading" field. Also make sure to check the "Calculate totals" box for the Material Area field.
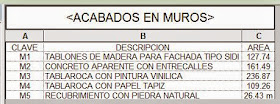
This is the resulting WALL finishes schedule:
Now it's turn to schedule Floor Finishes. Repeating the same steps you generate a Material Takeoff. For this one I did not choose the "Floor" category, instead I'm choosing MULTICATEGORY. Why? Because not only floors, I also want to report materials in countertops and stair treads.
Repeat the same procedure done for walls. The only diffrerence will be in the "Material Propertes / Filter" tab choose "Filter by - Material Mark - Begins with - P" because in the previous exercise we marked all floor materials with a P.
This is the resulting FLOOR finishes schedule:
Finally it's just a matter of putting everything together in a sheet: Floorplan, wall finishes schedule, and floor finishes schedule. Add a simple text for the schedule title.
 |
| Click to enlarge |


No comments:
Post a Comment